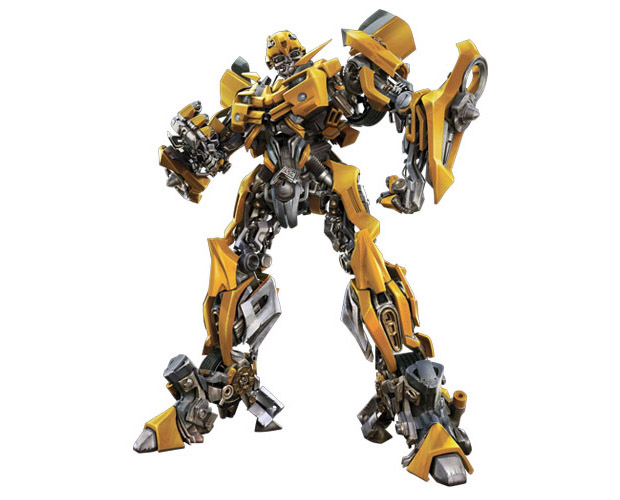
Transformers required some of the most complex modeling and animation ever attempted at Industrial Light & Magic.
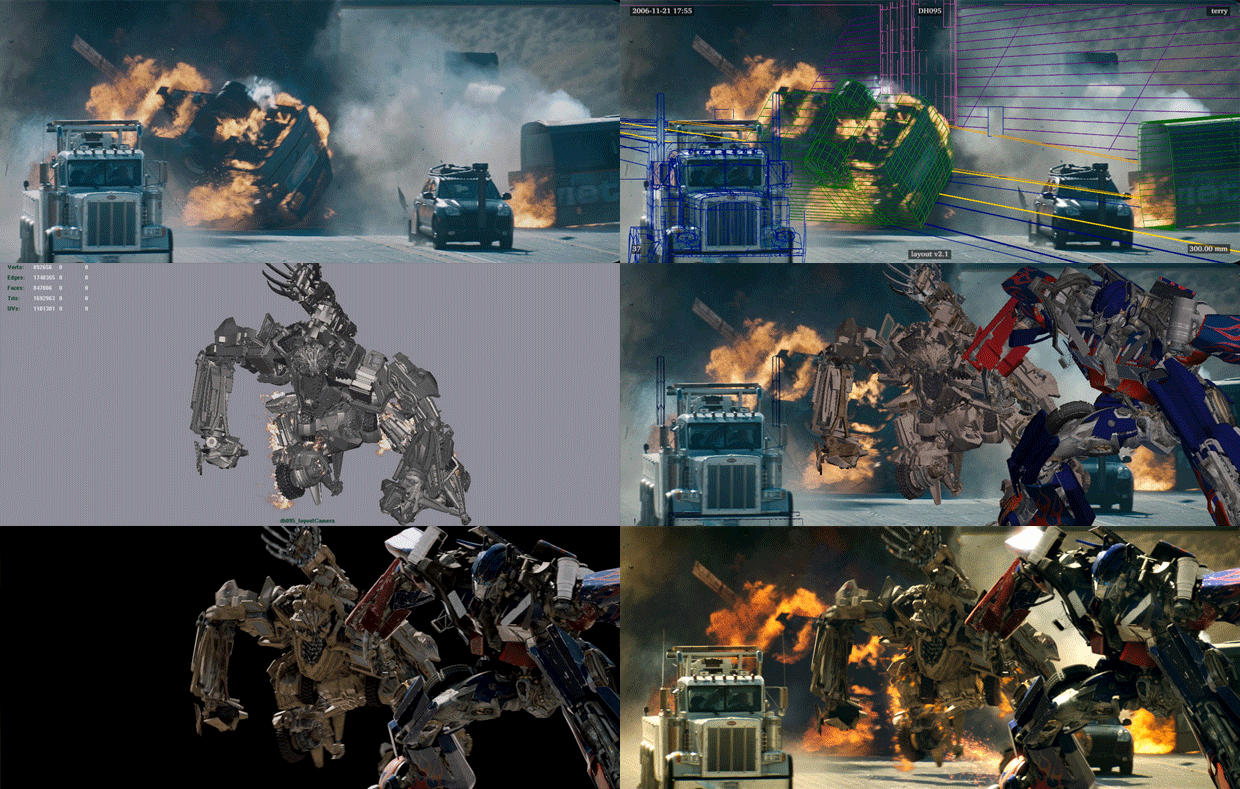
When exec producer Steven Spielberg gave the go-ahead to make Transformers (Paramount/DreamWorks, opening July 2), it was only after Industrial Light & Magic persuaded him that it could pull off the iconic Hasbro robots in CG. Which meant that the 30-foot-tall Autobots and Decepticons had to look real. No easy feat considering how complex and chained together they are. So, whereas the original Optimus Prime action figure has 51 pieces, the movie version has 10,108. On top of everything else, these were CG cars as well, and, with director Michael Bay, you had the ultimate car nut to please.
Thankfully, ILM was up to the challenge with visual effects supervisor Scott Farrar, animation supervisor Scott Benza, CG supervisor and lighting guru Hilmar Koch and the rest of the crew. Because they not only had to create 14 fully CG characters with all of their individually controllable vehicular pieces (from oil filters to axles to pistons to body panels) but also a new system that could tackle the immense rendering demands. Fortunately, ILM’s new artist-friendly Zeno platform, which handles file conversion, came in handy.
“This was really skillful artwork (hard surface modeling to build robots) – basically hand-painted 2D texture maps and a little bit of shader work”, Koch suggests. But there’s a whole lot of development, of course, in just getting the assets so that they’re correct and look right so we could go to this level of lighting refinement. The big innovations were making extremely high-resolution texture maps and making sure we could do hybrid rendering between ray tracing and non-ray tracing. And the internal innovation was the way we would bring assets into our rendering pipeline. We simplified the lighting pipeline so that when an asset comes in like a robot, the artists deal with a single entity and can drop it into the lighting structures. All of that is in service of being able to use the accurate modeling of the sets with the hybrid rendering geometry. Zeno allows you to be more true to off-the-shelf packages, with drag-and-drop lighting rather than typing everything in.

Koch adds that the computing power had to be increased as well, “The level of detail that Michael wanted for the robots required us to make the models heavier than anything I’ve ever seen in my life. The amount of geometry and texture mapping could not have been achieved without 64-bit computing. The ILM render farm was upgraded at just the right time. Frankly, I’m amazed that we got all of this done because the load on the equipment was pretty astonishing: the amount of terabytes that was online and the amount of images that was rendered every night.”
As for meeting the demands of hard surface modeling to build the robots, Koch explains that they had two or three people on set taking photographs from all angles that would be uploaded and shipped to ILM. “Up here we’d take commercially available software to stitch together high-res images, which we’d then map back onto the proxies of set geometries. In order to get the robots right, we’d first light simple gray and silver spheres until they fit into the environments. If we achieved that, usually we could take the heavy rendering assets that are the robots and put them in the same positions. In theory and practice, they were exposed to the same lighting on set. So if the spheres were right, the robots would just drop back in.”
For Farrar, who hails from a photographic background, Transformers indeed represents a new watermark in ultra realistic hard body surfaces. “This had to be rendered and it’s terribly complicated”, he echoes. For instance, in addition to Optimus Prime’s 10,108 parts, there are also 1.8 million polygons and 2,000 texture maps. Which is also why ILM developed dynamic rigging so the animators could deal with the large number of parts, interacting on the fly while paying attention to certain sections that they were animating. “Let’s say you had a close-up”, Farrar says, “and the animator only had to deal with one arm, shoulders, and a head. They basically identify the area and grab that to simplify it.”
Meanwhile, there were several advancements with regard to more realistic-looking lighting. “We were very specific as far as key lights and fill lights, not including the overall reflections: that was a given for each and every robot”, Farrar continues. “So we had to plus that out. But then we added key lights, shadows, cutters, and flags, so our robots would actually go in and out of narrowed lights with barn doors just like you’d do on sets. I wanted you to see that these are really big guys, so that if a robot knelt down toward camera, he actually moved out of a key on his left side and it got darker there, and he moved into a right key, and you really felt the volume lighting in ways you haven’t seen before.”
“We wanted it to be like dealing with real world materials: aluminum, stainless steel, copper, and bronze. So we tried to use car and engine parts. But the problem in CG was that we had to adjust shaders quite a bit because in putting the light on any one of those robots, all the different metals did not respond shot to shot. It required a lot of adjustments: once we’d get it for a daytime exterior with a key light coming from behind them, when you swung around to the other side it needed a whole new adjustment, where it’s frontally lit. That was custom fit for every lighting scenario.”
Color too posed a problem. Depending on the time of day, color temperatures altered a car’s look. For example, Jazz, the gray car, could have different shades of gray. “You could find photo reference but this was somewhat of a moving target, which is what made it so difficult”, Farrar insists. “We actually recorded every single camera position as far as reflective environments, plus we had the Macbeth color chart, and we had to abide by that very specifically, even though we could cheat too. So we started out with a lot of reference photography of each of the cars, and you will see beyond that in some of the close-ups, that we wanted to have the metal flake that’s in the paint. This was all done in the computer and it has to exactly duplicate what’s in the real world, including the clear coat and the several coats of finish that go in a paint job and specific reflection and refraction.”
“We used every bit of ray tracing but it’s also a tribute to our modelers and paint people because of the layers of bump and paint. Of course, as we moved forward, we started throwing the robots or cars in the shots. Optimus is a good example. There was a particular shot where suddenly his chest, which is comprised of the firewall and the cab windows and windshield wipers, is front and center. So Ron Woodall, who’s our paint lead, would get called in for more detail like the molding, scratches and oil smears. He and his team would provide a bump map so we wouldn’t have to change the model itself.”
“Now we did have to go back in for the eyes, which were a problem. We had specific designs from Michael and the production design staff. Those were 2D and as soon as went into 3D, once we tried to get the animation moving, especially the eyes, I was not happy. We couldn’t get the eyes to look on and off access. If you did little eye darts, you couldn’t read something that might be a pupil. We’re used to what eyes really look like, so we put an (improved) internal tube with lighting inside, so you could get a better read, and we also put in what I call Norelco blades, which is a circular thing that ratchets around, and can open and close – it’s 50 or so pieces. This was so you could get some emotion, not including the hundreds of cheek pieces and the rest of the metal bars around the eyes, that can help mimic a wink, blink, or wince. Bumblebee was our litmus test. I knew what the materials were, and once he looked realistic to me and was emoting, even the tilt of the head, we hit something terrific.”
Farrar credits the Creature development team with not only successfully chaining the characters but also coming up with a more nimble Ninja fighting style. “Scott Benza did months of testing – MoCap, keyframe animation simply based on reference tapes that we made ourselves for motion study. We wanted a much more interesting look for fighting rather than the old stomping style.”
In terms of hard surface strides, Farrar stresses how difficult the group shots were, with or without transformation. “When they meet Shia (LaBeouf) for the first time in the alley at night, that’s 36 hours per frame to render, which is a lot of computer memory.”
But the other big achievement, according to Farar, is improved simulation, especially with a moving camera. “All the things that go into the layering of shots look real: textures and the ability to light them better. We’re not there yet for getting over the simulation hump, but, as a supervisor, I tend to think it’s going to be better if I can shoot this real. But that area is just now becoming photoreal. What’s going to push it further, I think, is increasing the talent base to do simulations. It’s a difficult task and highly unpredictable. It takes a certain kind of artist. We’ve got a couple of digital artists that can practically do everything: They can light the shot, they can break it all down and do the compositing and maybe do some particle renders and get some simulations into their shots.”
“What I’m seeing is that the artists are learning to observe real world and real life and constantly referencing what is out there, which is so beautiful and complicated and so hard to recreate. What is different? I think the perception of the artist is different.”
Article Written by: Bill Desowitz, editor of VFXWorld

