Cable Harness Design & Creo Schematics WEEK ONE
Creo cable & Harness Training class Description
This five-day Creo Cable & Harness training course is designed for Drafters, Mechanical Engineers, Electrical Engineers, and those technicians involved in managing schematics, electrical cabling, wiring, cabling, and harness design. Participants will develop a foundation and expertice of routing cables and individual conductors within Creo assemblies and become proficient in harness design within one week.
During the latter part of the week, training, lectures, and examples will focus on using Creo Schematics to create 2D electrical harnesses and then routing that geometry through 3D Creo assemblies to determine wire lengths and generate accurate nail board drawings of the flattened harnesses. By the end of the course, participants will be able to create 3D electrical harnesses and produce associated manufacturing deliverables using your or the latest version of Creo.
If your organization does not plan to use Creo Schematics, this course can be adjusted accordingly.
See WEEK TWO harness design & the full week of Creo Schematics training course.
Creo Cable HArness training Class Topics
- Serious overview of various types of connectors, harness wire and cable management variants & types of components to harness designers will want to rout to.
- Prepare downloaded connectors for an efficient library system
- Learn to establish UDF features establishing the hole cutout where connectors are screwed into sheet metal for example.
- Point & Shoot, Learn to rapidly add connectors to the harness assembly (component interface)
- Set up, import, or model connectors effectively so the connector coordinate systems can be changed without failing the Creo Harness
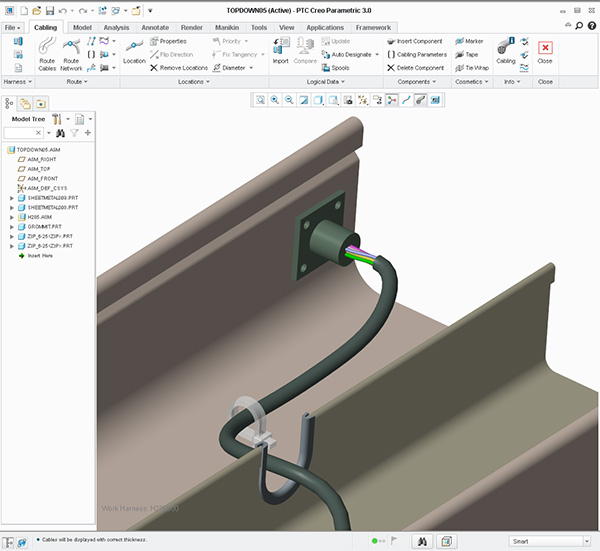
- Route electrical harnesses through Creo assemblies and separate top-down models
- Learn to utilize a skeleton part with surfaces that facilities the routing process of various components and surrounding geometry that may not yet exist in your assembly yet your expected to route wires, cables and harness
- Create flattened harnesses for manufacturing
- Learn how to create Wiring Diagrams and utilize that XML data to later autoroute functions through assemblies
- Document harness designs by creating drawings that include customized BOM tables and wire list information
- Gain a firm grasp on large Assemblies and Top-down designed, flattened harnesses with manufacturing details such as wire and conductor lengths
- Create Electrical Cable and Harness Assembly structures within a Creo Assembly
- Overcome workflow issues when making changes to harness assemblies
- Learn to route wires conductors, pin-to-pin with multiple connectors both with and without Creo Schematic XML exports
- Facilitate a Creo Cable Harness into Flat Harnesses for Manufacturing and Harness Detail Drawings
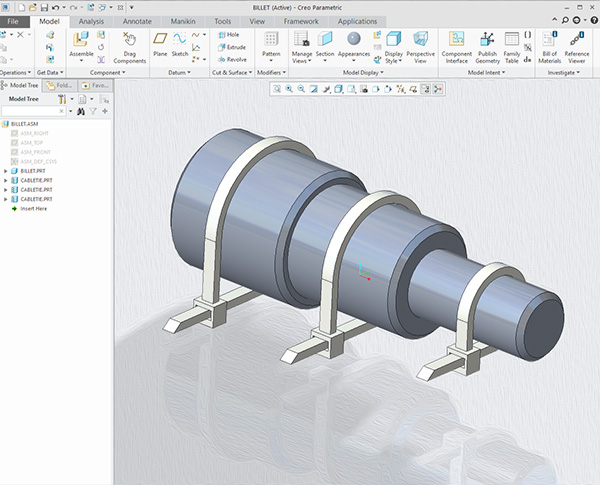
- Modeling 3D Electrical Harness assemblies with Top-down design in Creo
- Learn to manage harness components that are assembled to the flattened harness properly
- Learn to use Creo Schematics from a technician drafter perspective for routing wires and or cables through Creo assemblies
- Create 3D electrical harnesses and associated manufacturing deliverables.
- Learn to use flexible components such as nylon straps where the same part number can accommodate various bulk of the harness
Creo Schematics training Topics
- Learn how to use Creo Schematics to create schematic diagrams for later routing in your Creo electrical harness assembly
- Modify existing Creo Schematics for successful XML export to Creo assemblies for auto-routing
- Create with Creo Schematics to transfer information into 3D harness designs through Creo Assemblies
- Understand the 2D schematic design processes for electrical harness designs
- Configure the Creo Schematics working environment and catalog library components to use with your schematic
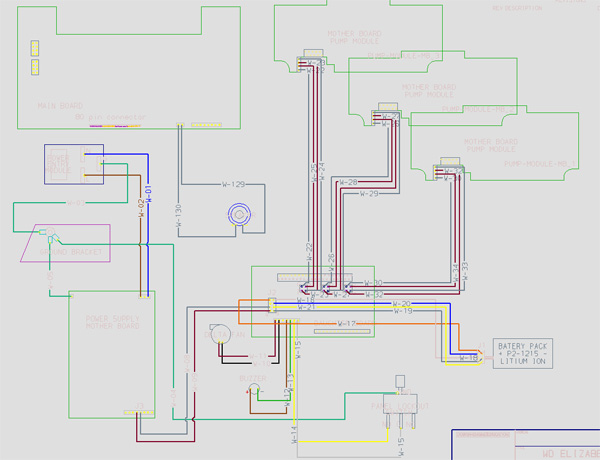
- Create wiring diagrams including wire interconnect diagrams
- Push diagram information via XML to Creo Parametric assemblies and their respective drawings
- Learn to problem solve schematics and their Creo assembly counterparts
- Create catalog components *Library symbols that will properly match up to your 3d library parts in Creo Parametric
- Create parametric library parts ie variable groups
- Learn to customize spool information
Creo Cable and Harness training Duration & Cost
40 hours = $2850 per participant
For corporate rates, please call (312)226-8339
Prerequisites
CREO LEARN TO DESIGN and a basic understanding of ASSEMBLIES and TOP-DOWN DESIGN are extremely helpful.
Creo Harness Discussions
- Describe with photos and images various cables and harnesses with examples from missiles, and drones to motorcycles and cars.
- Discuss the fabrication and manufacturing process for establishing cables and harnesses from prototype to production.
- Describe with photos and images the wide variety of connectors and various electronic components for developing cables and harnesses.
- Describe with photos and images various cable management components and methods.
- Discuss how Creo Schematics integrated with routing cables and auto route work together to enhance efficiency
- Expound alternate ways to gather usable connectors i.e. IGES/STEP from connector manufacturer websites and resources
- Discuss the difference between wires and cables from a fiber perspective in both Creo Schematics and subsequent Creo assemblies
- Discuss how to handle modifications to a cable if parts of the harness the assembly turn up missing
- Discuss how Top-down design or surfaces can aid in the cable routing process
- Review why a designer might want to use top-down design relationships made for routing harnesses before submitting to Team Center, Windchill or other library system
- Illustrate and discuss problems with auto-route with respect to spool data, schematics, and network cables
- Manage Creo Schematic libraries within Windchill
- After successfully completing this Creo Cable and Harness design course, participants will be able to create 3D electrical wire, cables, and subsequent harnesses and associated manufacturing deliverables using Creo assemblies and Creo Schematics.
Creo Harness Projects
Design Engine has prepared a series of 15+ Creo Harness & Creo Schematics tutorials designed to lead the participants through the cabling design and modification process.
Day 1: Create and/or download various IGES or STEP connectors from your favorite connector supplier, then prepare those connectors for routing. Learn to establish User Defined Features “UDF’s”, for mounting connectors within an assembly. Learn to point and shoot library connectors into location (leveraging component interfaces properly). Learn to route wires and conductors by hand, without the use of Creo Schematics. Learn to create spools that assign various Route both single wires then cables in three separate examples
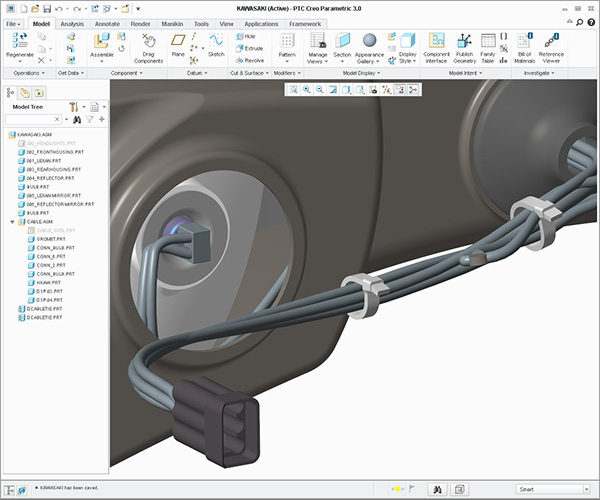
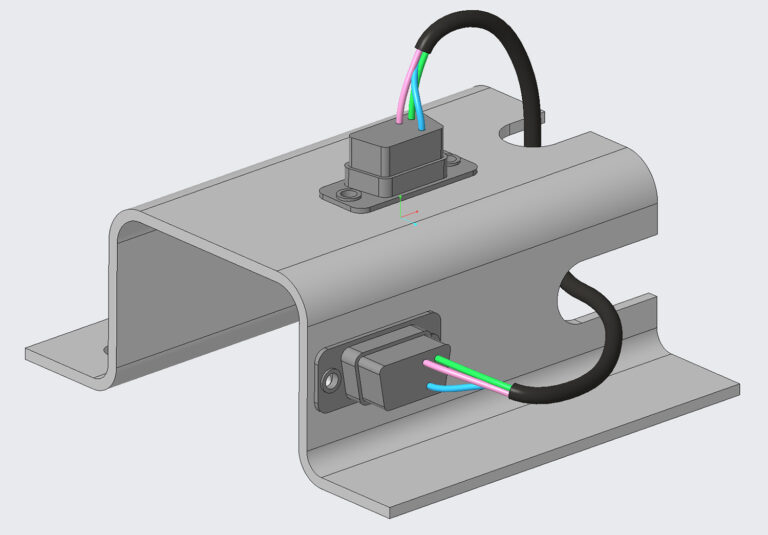
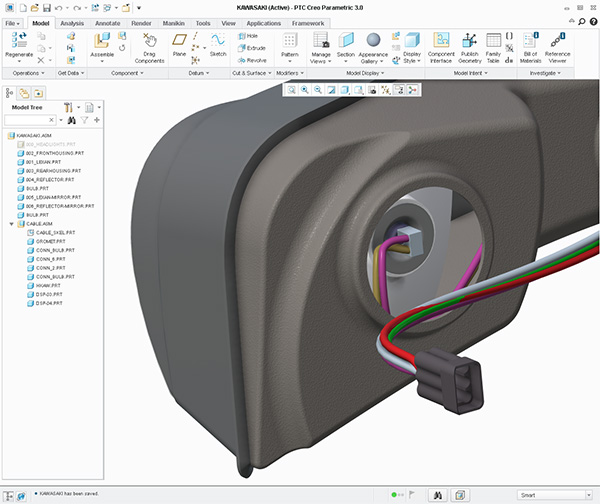
Day 2: Explore the use of Creo Top-Down design as it relates to Creo Cable & Harness Design. Route one harness then learn to flatten that harness to make a flattened nail board drawing. Instructor will demonstrate the XML export of a Kawasaki headlamp Schematic into a Creo Parametric Assembly to route the harness. Serious introduction to Creo Schematics where participants learn to change parameters that prepare for XML export.
Day 3: More intermediate demonstration using Creo Schematics. Learn to create Creo Schematics library symbols. Create a simple custom schematic diagram to export that logical data, then route the harness using Creo Parametric assembly.
Day 4: Complete exercise from day three. Discuss any problem solving techniques for figuring out any problems. Start a new project that is more complicated using Creo Schematics then route that new schematic using Creo Parametric. Flatten that harness and create a drawing.
Day 5: Create more custom Creo Schematic Symbols relative to your work, then use those symbols to create a more complicated schematic related to your work. Use this day to start your company connector library.
Video Training Delivery System
Ask your Design Engine account manager about our Training Delivery System(TDS), an easy-to-follow guide for designers and engineers who want a supplement to this course.